The Ultimate Toolbox for creating
amazing web sites!
Creating a Form
A form provides a way you to collect information from the people who view your web pages. A viewer enters data or makes choices among several options and then submits the form. The results can be sent to you by email and/or if your web server has the right software, you can save the form results in a MySQL database or CSV file.
How do I create a form in WYSIWYG Web Builder?
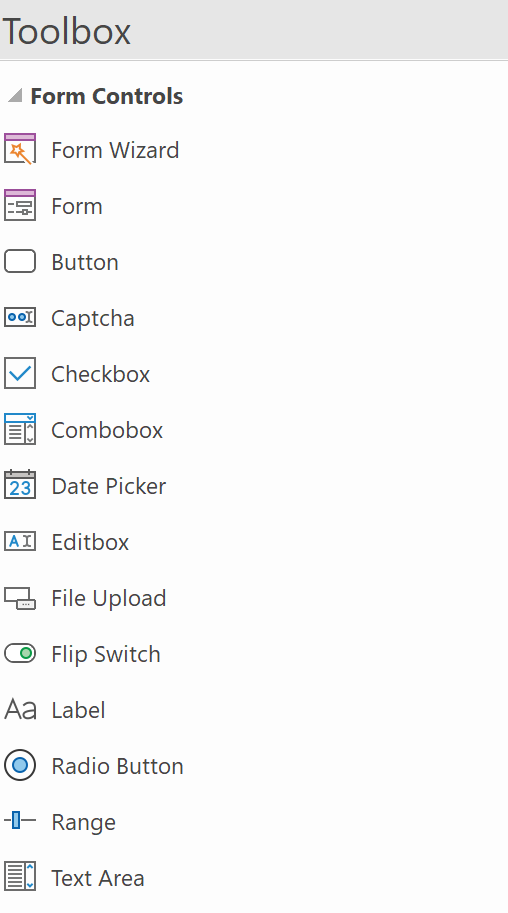
Drag the Form container from the toolbox to the page.
How do I create a form in WYSIWYG Web Builder?
Drag the Form container from the toolbox to the page.

Design your form by adding some Form controls to the form. WYSIWYG Web Builder includes a wide range of form controls like:
buttons, checkboxes, radio buttons, editbox etc.You can also make text, images and other objects part of the form.
buttons, checkboxes, radio buttons, editbox etc.You can also make text, images and other objects part of the form.
Notes:
• It is important that all form elements are inside the form area, otherwise the data of the element will not be sent!
• Instead of a form object, you can also use a Layout Grid, Layer, Dialog, Tabs or Flex Container and configure it as a form.
• It is important that all form elements are inside the form area, otherwise the data of the element will not be sent!
• Instead of a form object, you can also use a Layout Grid, Layer, Dialog, Tabs or Flex Container and configure it as a form.
Now let's create a simple feedback form. Note that the demo project (wbs) is available at the end of this tutorial.

The text labels (Name, Rate my site, Poor, Good and Excellent) on the form were created using are Label objects.
With the 'For' property of the Label you can link the label to the input field so when you click on the label the input field will be selected.
With the 'For' property of the Label you can link the label to the input field so when you click on the label the input field will be selected.

The input field for the name is an Editbox, where the name is set to: Name.
The 3 controls for the rating are Radio Buttons. All radio buttons have the same Group Name: Rating, so only one item can be selected.
The Type property of the Button is set to submit, so when the button is clicked the form will be submitted automatically.
The 3 controls for the rating are Radio Buttons. All radio buttons have the same Group Name: Rating, so only one item can be selected.
The Type property of the Button is set to submit, so when the button is clicked the form will be submitted automatically.

Form Input Fields
WYSIWYG Web Builder has many different type of form input fields. For instance: Button, Checkbox, Editbox, Radio Button, Select, File Upload and much more. We've created a dedicated tutorial to give you an overview of the available form input fields:
https://wysiwygwebbuilder.com/form_input_fields.html
https://wysiwygwebbuilder.com/form_input_fields.html
Form Action
The "Action" property of a form determines what will happen when a user clicks the "Submit" button after filling out the form.
This property essentially dictates how the information entered into the form will be handled or processed. There are various methods to process the form, and these methods depend on what you specify in the "Action" property.
• use mailto
• use the built-in form processor script
• use your own script
• use a third-party form service

Use 'mailto' (not recommended!)
The most basic way to send the data via email, is by using mailto in the form's action property:
mailto:youremail@email.com
When you use mailto in a web form's action field, it means that when the form is submitted, the user's email client (like Outlook or Gmail) will open with a new email draft already filled out with the form data. The user can then review the information and send the email directly from their email client. It's a simple way to allow users to submit form data via email without the need for server-side processing.
However, this is not a very reliable solution because it depends on the browser configuration which is different for each user.
See also this related FAQ: http://www.wysiwygwebbuilder.com/forum/viewtopic.php?t=135
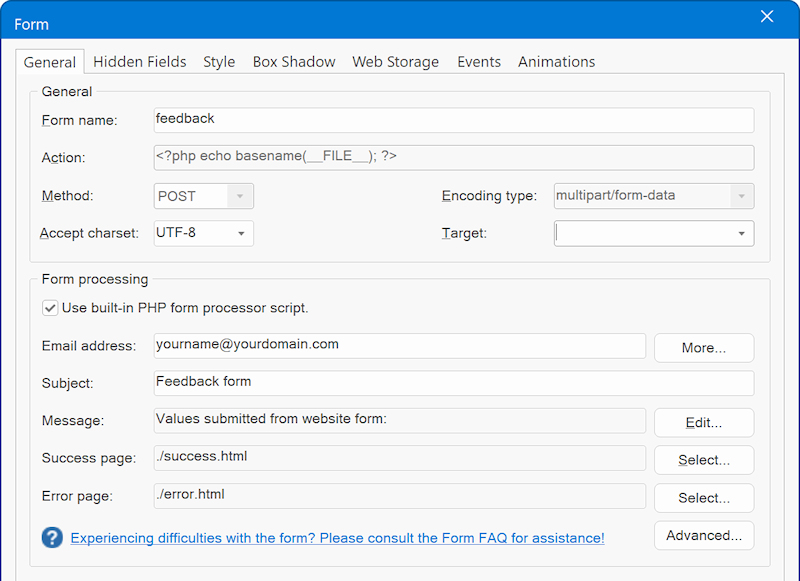
Use Built-in PHP form processor script
Instead of using mailto, it is better to use server sided scripting (PHP).
WYSIWYG Web Builder has a built-in PHP form processor script. This implements all the basic features of a form processor like sending an email, saving it to a file on the server or even store it in a MySQL database!
Click Use Built-in PHP form processor script to enable the built-in script and fill in all required properties.
Email address (required)
The email address where the results of the form will be send to. You can only specific one email address in this field!
Click the 'More' button to specify multiple email addresses (CC/BCC). Use commas to separate email addresses.
Subject (required)
The subject of the email message.
Message (required)
A short message that will be added to submitted data.
Success page (required)
The page that the user will be redirected to after the data has been submitted (after the 'submit' button has been pressed).
Error page (required)
The page that the user will be redirected to if an error occurred while processing the data.
Important:
- PHP is required, so the page with he form must be published to a web server with PHP support
- Also, make sure the File Extension of the page in page properties is set to 'php', otherwise the server will not process the page.
- PHP is required, so the page with he form must be published to a web server with PHP support
- Also, make sure the File Extension of the page in page properties is set to 'php', otherwise the server will not process the page.
Advanced Form Properties
The built-in form processor has many other features like saving the data to a MySQL database, CSV or uploading files.
There is also built-in support for PHP Mailer, in case your webhost requires (secure) SMTP configuration.
See the help for more details about this or click the 'Advanced' button to explore them;)

Custom or third party form processing
You can also write your own script to process the submitted form data or use a third party form processing service like https://formspree.io
In that case, make sure 'Use Built-in PHP form processor script' is off and set the URL of the form script in the 'Action' field.
An example how to write your own form script is available here: https://www.wysiwygwebbuilder.com/forms_php.html (for advanced users!)
How to use a form in flexible layout (Layout Grid, Flexbox)?
Since a standard form uses a fixed/absolute layout, it can’t be placed inside a Layout Grid. However, the Layout Grid itself can act as a form and supports all the same features as a standard form. You can also use the Form Wizard to create flexible forms using layout grids.

What if form does not work?
The built-in form processor has been tested extensively and has been used successfully by many users.
The script should work on any server that supports PHP. Most problems are caused by wrong settings or server sided issues.
For an overview of common issues and solutions please see: Frequently Asked Questions about Forms
The script should work on any server that supports PHP. Most problems are caused by wrong settings or server sided issues.
For an overview of common issues and solutions please see: Frequently Asked Questions about Forms
Demo Project (wbs)
The project for this tutorial can be downloaded here:
https://www.wysiwygwebbuilder.com/support/form_demo.zip
https://www.wysiwygwebbuilder.com/support/form_demo.zip
Related tutorials
Form Wizard
Form Validation
Form Input Fields
Form Conditions and Calculations
Input Mask
Creating a Form with a popup confirmation
Form Validation
Form Input Fields
Form Conditions and Calculations
Input Mask
Creating a Form with a popup confirmation
