The Ultimate Toolbox for creating
amazing web sites!

Step 3
Next we'll insert the Buy Now button, select PayPal->Buy Now Button from Web Builder menu. Double the object to edit its properties. In the General page you should enter the email address of your PayPal account. You can use the default Buy Now button design or you can choose another button. Alternatively, you can use your own custom image.
Next we'll insert the Buy Now button, select PayPal->Buy Now Button from Web Builder menu. Double the object to edit its properties. In the General page you should enter the email address of your PayPal account. You can use the default Buy Now button design or you can choose another button. Alternatively, you can use your own custom image.
Adding a PayPal Buy Now button to your website
If you want to setup your own e-commerce store then PayPal is one of the easiest ways to add payment facilities to your website. It's quick and simple to sign up for a PayPal acoount, whether you're using it for personal or business purposes.
WYSIWYG Web Builder makes it even easier to integrate PayPal payment option into your website. You can add 'Buy Now' one-click buttons, setup a donation link or even connect to PayPal's own shopping cart system. Using these services is free- all you pay for are the transactions. In this tutorial we'll give you an introduction how to add a 'Buy Now' button to a static website.
Note: There is also a tutorial about how to integrate the PayPal shopping cart into your website.
The PayPal Buy Now button, is the ideal option if you want to sell individual items from your website. When the buyers click the Buy Now button they're taken directly to the PayPal transaction page and are prompted to pay for the selected goods by credit card via PayPal, or from their PayPal account funds.
WYSIWYG Web Builder
WYSIWYG Web Builder is a What-You-See-Is-What-You-Get program used to create web pages.
Website publishing easier than ever before!
Price: $59.95
WYSIWYG Web Builder is a What-You-See-Is-What-You-Get program used to create web pages.
Website publishing easier than ever before!
Price: $59.95
Step 4
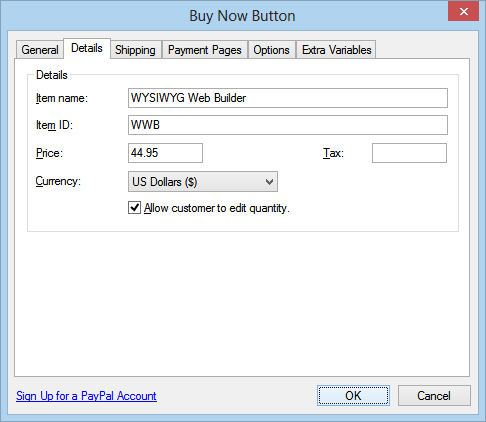
In the Details page you can enter the details of the item you wish to sell. Enter a name for the item. If you don't complete this field, your customer will be able to fill it in when they're taken to PayPal. But for tracking and shipping purposes, it's better if you do it yourself. The Item ID is an unique number which enables you to track your sold items more easily. Your customers won't see this ID number, it'll just be sent to you along with your customer's transaction. Also enter a price for the item and specify a currency for the price. When the option Allow customers to edit quantity is enabled you can provide your buyers with the option to buy more than one of the item that you are offering. This will add a Quantity box to the order form.
In the Details page you can enter the details of the item you wish to sell. Enter a name for the item. If you don't complete this field, your customer will be able to fill it in when they're taken to PayPal. But for tracking and shipping purposes, it's better if you do it yourself. The Item ID is an unique number which enables you to track your sold items more easily. Your customers won't see this ID number, it'll just be sent to you along with your customer's transaction. Also enter a price for the item and specify a currency for the price. When the option Allow customers to edit quantity is enabled you can provide your buyers with the option to buy more than one of the item that you are offering. This will add a Quantity box to the order form.
Step 5
In the Shipping page you can specify shipping and handling costs. These values are optional.
Base shipping: The cost of shipping this item if you have enabled item-specific shipping costs.
Extra shipping: The cost of shipping each additional item.
Handling costs: Handling charges. This is not quantity-specific. The same handling cost is charged regardless of the number of items purchased.
Require shipping information: Specifies whether to prompt the customer for a shipping address.
You can optionally provide an additional text area where buyers can add any additional information or instructions to the order by enabling the option Allow customer note
Step 6
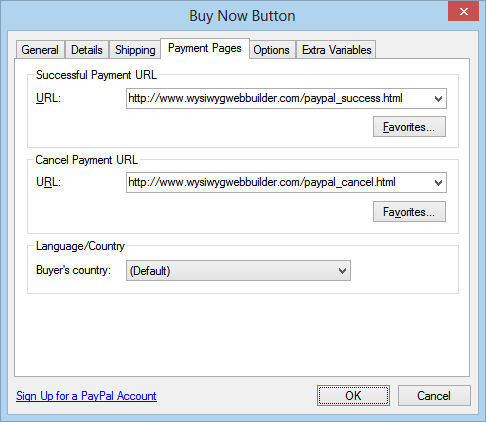
In the URLs page you can specify the URLs to which customers will be redirected once their payment has been completed.
Successful Payment URL is the destination URL to which you would like Paypal to send your customers once their payment has been successfully completed.
Cancel Payment URL is the destination URL to which you would like Paypal to send your customers if they wish to cancel their payment.
More information:
https://www.paypal.com/cgi-bin/webscr?cmd=p/xcl/rec/singleitem-intro-outside


Step 1
First you will have to sign up for a PayPal account. Select either the Premier account if you want to sell under your own name or Business Account if you'd rather sell using a business name.
Sign Up for a PayPal Account now:
https://www.paypal.com/
First you will have to sign up for a PayPal account. Select either the Premier account if you want to sell under your own name or Business Account if you'd rather sell using a business name.
Sign Up for a PayPal Account now:
https://www.paypal.com/
Step 2
Once you have setup your PayPal account you can start building your online webshop. Before you add the Buy Now button to your page you probably want to insert a description of the item you want to sell, the object's price and an image of the object.
Here's an example how you can setup your object:
Once you have setup your PayPal account you can start building your online webshop. Before you add the Buy Now button to your page you probably want to insert a description of the item you want to sell, the object's price and an image of the object.
Here's an example how you can setup your object: