The Ultimate Toolbox for creating
amazing web sites!
How to use the Carousel to create a multi-page form?
From version 12.2 it is possible to use the Carousel as a form. This makes it easy to create multi-page forms.
In this tutorial we will use the Carousel to create a multi-page form with wizard-like layout.
Note: Before starting with this tutorial, make sure you have read the other Carousel related tutorials to understand the basics.
Step 3
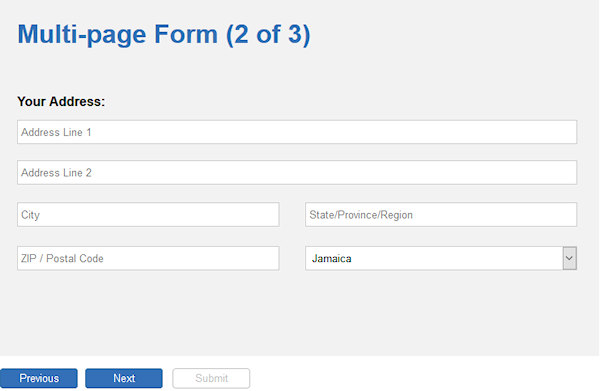
Add 3 buttons below the Carousel to control the slides: Previous, Next and Submit (or Finish).
Add 3 buttons below the Carousel to control the slides: Previous, Next and Submit (or Finish).
Download the demo project:
http://www.wysiwygwebbuilder.com/support/carouselwizard.zip
Related tutorials:
http://www.wysiwygwebbuilder.com/carousel.html
http://www.wysiwygwebbuilder.com/carousel3d.html
http://www.wysiwygwebbuilder.com/carouselevents.html
http://www.wysiwygwebbuilder.com/carousel_fullpage.html
http://www.wysiwygwebbuilder.com/support/carouselwizard.zip
Related tutorials:
http://www.wysiwygwebbuilder.com/carousel.html
http://www.wysiwygwebbuilder.com/carousel3d.html
http://www.wysiwygwebbuilder.com/carouselevents.html
http://www.wysiwygwebbuilder.com/carousel_fullpage.html
Step 4
To give the buttons a different appearance for when they are enabled/disabled, we can use Styles.
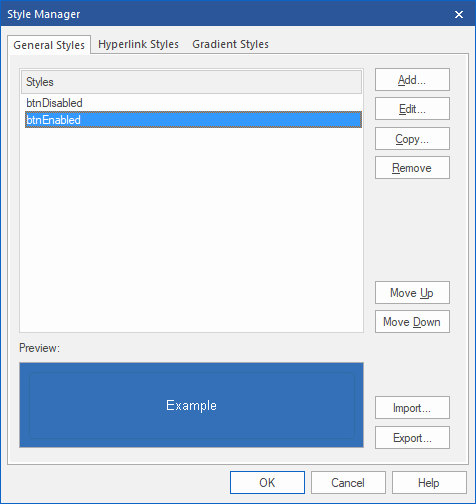
Open the Style Manager and create two new styles: btnEnabled, btnDisabled.
To give the buttons a different appearance for when they are enabled/disabled, we can use Styles.
Open the Style Manager and create two new styles: btnEnabled, btnDisabled.
Step 1
Add the Carousel object to the page.
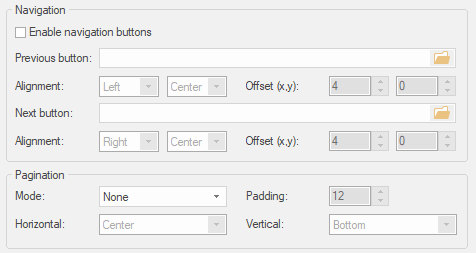
This demo uses external buttons to control the Carousel slide, so first lets disable the built-in navigation and pagination.
Add the Carousel object to the page.
This demo uses external buttons to control the Carousel slide, so first lets disable the built-in navigation and pagination.
Step 2
In the properties of the Carousel, check 'Enable Form' so it behaves like a form. In the Settings you can change the form's properties.
These are the same settings as a standard form so we will not get into details about that. The focus of this tutorial is on the multi-page layout of the form.
In the properties of the Carousel, check 'Enable Form' so it behaves like a form. In the Settings you can change the form's properties.
These are the same settings as a standard form so we will not get into details about that. The focus of this tutorial is on the multi-page layout of the form.
Step 5
In the "Style' section of the buttons select 'btnDisabled' for all 3 buttons.
In the "Style' section of the buttons select 'btnDisabled' for all 3 buttons.
Step 7
Finally we have to add some form controls for the user input, like editboxes, checkboxes etc.
For this demo we just added some random input fields...
Demo:
http://www.wysiwygwebbuilder.com/support/carouselwizard.html
Finally we have to add some form controls for the user input, like editboxes, checkboxes etc.
For this demo we just added some random input fields...
Demo:
http://www.wysiwygwebbuilder.com/support/carouselwizard.html


Add an event to the Previous button: onclick -> Slideshow Previous -> Target: Carousel1
Style name: btnEnabled
background-color: #3370B7
border-color: #2E6DA4
border-style: solid
border-width: 1
font-family: Arial
font-size: 10
text-color: #FFFFFF
Style name: bntDisabled
background-color: #FFFFFF
border-color: #C0C0C0
border-style: solid
border-width: 1
font-family: Arial
font-size: 10
text-color: #C0C0C0
custom style: cursor: not-allowed; pointer-events: none;


Step 6
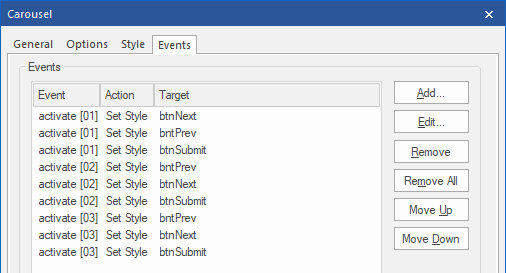
Next we will dynamically enable/disable the buttons based on the current slide using Carousel Events.
Next we will dynamically enable/disable the buttons based on the current slide using Carousel Events.

Add an event to the Next button: onclick -> Slideshow Next -> Target: Carousel1
Add an event to the Submit button: onclick -> JavaScript: document.getElementById("Carousel1").submit();
This makes the button a submit button for the Carousel/Form without being part of Carousel itself.
This makes the button a submit button for the Carousel/Form without being part of Carousel itself.


activate[01] - First slide
bntNext: SetStyle -> btnEnabled
btnPrevious and btnSubmit: SetStyle -> btnDisabled
activate[02] - Second slide
bntNext and btnPrevious: SetStyle -> btnEnabled
bntSubmit: SetStyle -> btnDisabled
activate[03] - Third slide
btnPrevious and btnSubmit: SetStyle -> btnEnabled
bntNext: SetStyle -> btnDisabled
