The Ultimate Toolbox for creating
amazing web sites!
Adding HTML, Javascript or PHP to a web page
WYSIWYG Web Builder is not an HTML editor, which means that the HTML does not exist until you preview or publish the page. Therefor, you cannot directly edit the HTML. However, you can insert custom HTML or scripts to the web pages generated by the software.
Important note:
When incorporating custom HTML or scripts, it is crucial to have a solid understanding of what you're doing. Adding erroneous code or placing it in the wrong section of the page can disrupt the HTML structure and lead to a multitude of errors on the page.
In most cases, any code that functions correctly in another editor will perform equally well in WYSIWYG Web Builder since it's inserted "AS IS." However, if the code is incomplete or improperly inserted, it might not function as intended.
HTML object
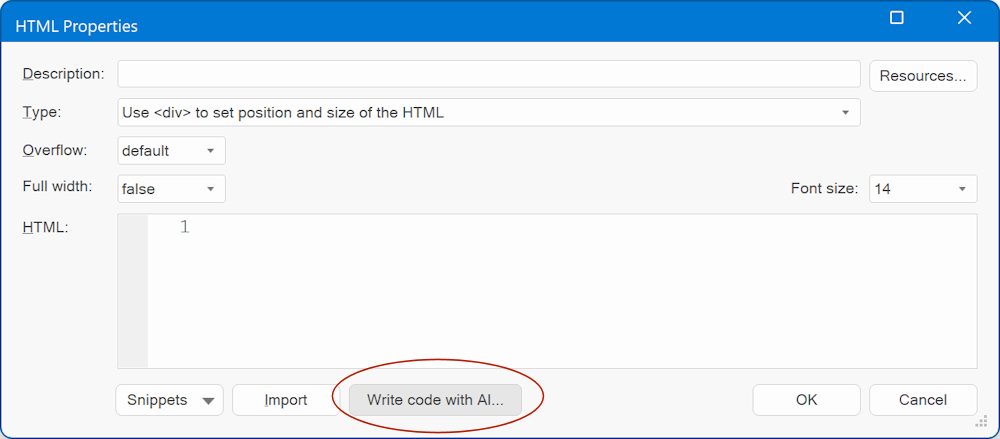
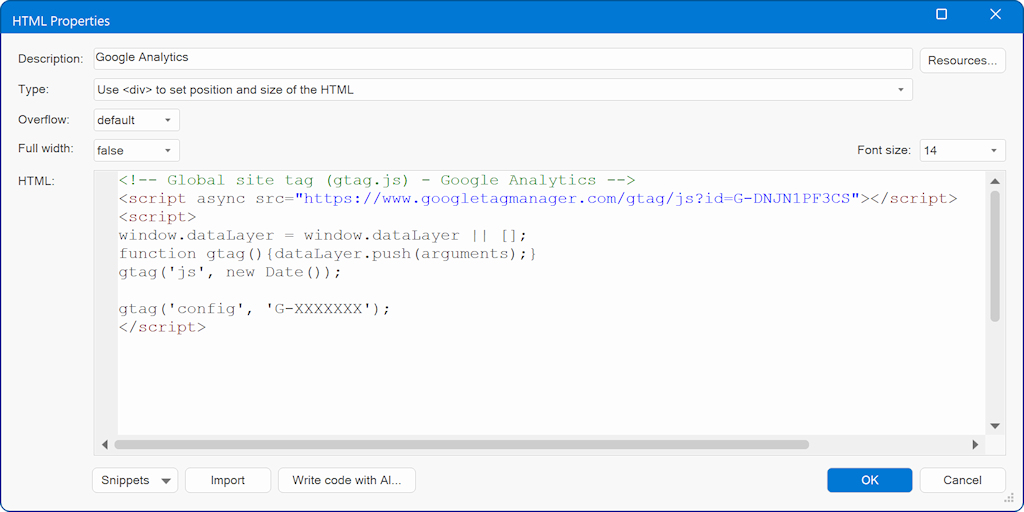
The most common way to insert HTML into a web page is by using the HTML object. You can use this to add counters, ads, banners or javascripts. Select Insert -> HTML to add the HTML object to your page. Double click the object to edit its properties. Now you can enter a description of the HTML (so you can identify the code later) and the HTML code. WYSIWYG Web Builder will automatically add position information to the HTML so the counter, ad, banner etc will be displayed in the position of the HTML object. It's also possible to use the HTML object to insert code inside the <head> tag or at the start/end of the page/body by selecting another Type. See the help for more details about that.
Page HTML
This method should be used if you want to insert HTML in the <head> or <body> tags of the page.
From the menu select Page -> Page HTML to display the Page HTML window.
From the menu select Page -> Page HTML to display the Page HTML window.
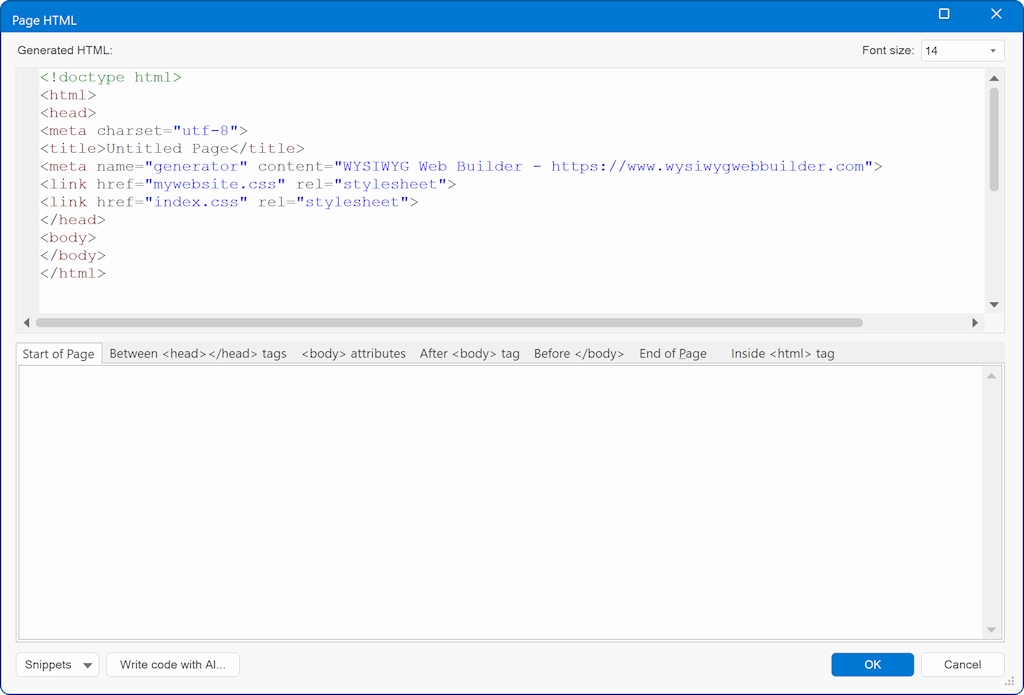
In this window the HTML generated by Web Builder is displayed. To insert your own code, select the appropriate Tab. Select if the code should be inserted at the Start of Page, Between Head tag, Inside Body tag, Beginning of Body, End of body or end of page.
Add HTML to an object
It's also possible to insert custom HTML for a specific element, so you can for example add an extra attribute.
From the menu select Edit -> HTML to display the Object HTML window.
From the menu select Edit -> HTML to display the Object HTML window.
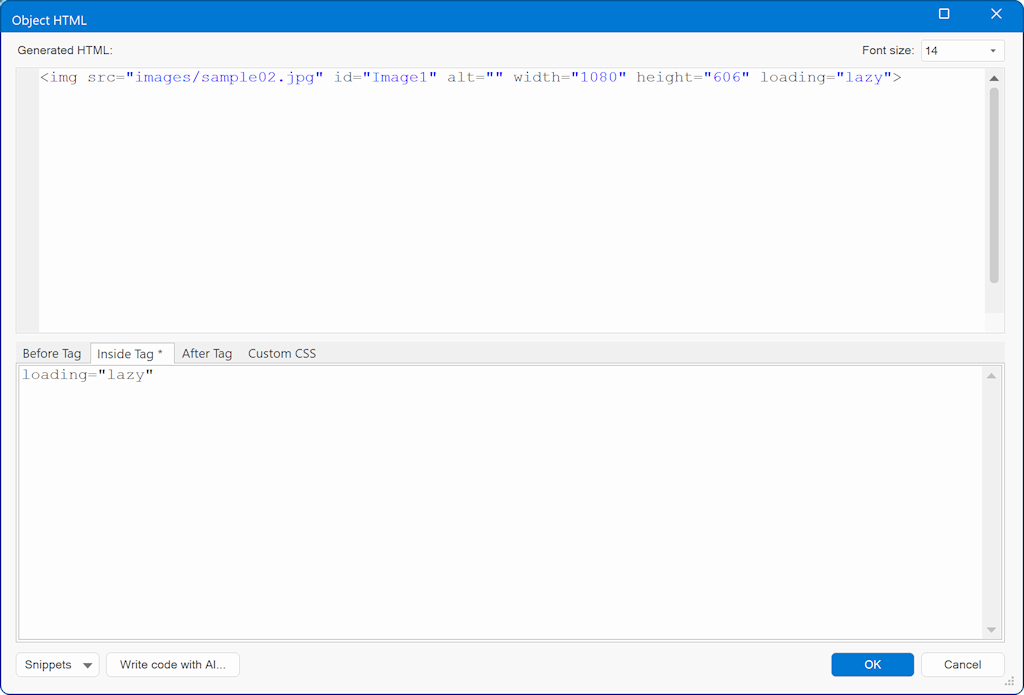
In this window the HTML generated by the software is displayed. To insert your own code, select the appropriate Tab. Select if the code should be inserted at the Start of Page, Between Head tag, Inside Body tag, Beginning of Body, End of body or end of page. There is also an option to insert custom style attributes.
by the software.
by the software.
Note:
When you insert code in the Page HTML window, make sure you DO NOT include the <!DOCTYPE>, <html>, <head> or <body> tags! These tags (for the HTML page structure) are already generated by WYSIWYG Web Builder.
When you insert code in the Page HTML window, make sure you DO NOT include the <!DOCTYPE>, <html>, <head> or <body> tags! These tags (for the HTML page structure) are already generated by WYSIWYG Web Builder.
In general, we do not provide support for custom code or custom scripts. By that we mean code/script that was not created by the WYSIWYG Web Builder. We assume that if a user wants to use JavaScript, PHP, ASP or any other scripting language, he/she has the necessary programming skills to manage his/her scripts. The tools we provide are meant only for advanced users and for users who are knowledgeable enough to manage their scripts using those tools.
If you have limited experience or knowledge about scripting and troubleshooting custom code, we strongly recommend that you look into hiring a web developer to assist you. We can only support code that was generated by the software.
If you have limited experience or knowledge about scripting and troubleshooting custom code, we strongly recommend that you look into hiring a web developer to assist you. We can only support code that was generated by the software.
Artificial Intelligence
WYSIWYG Web Builder has built-in support for AI Code Generation. You can utilize AI functionality within HTML objects, Object HTML, and Page HTML. This includes adding scripts, HTML, CSS, PHP, and more, making it a useful tool for developers.
To learn more about the built-in AI functionality, please see this related tutorial: Getting started with AI
Include external files
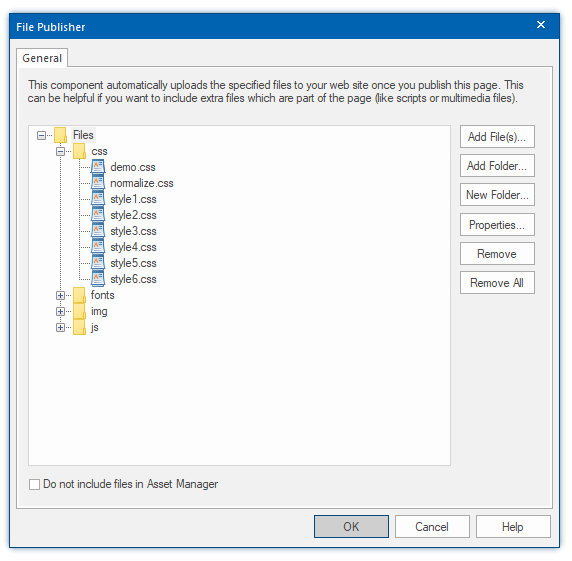
Sometimes you may need to include external files to the added custom code. For example, external script libraries (*.js) or style sheets (*.css). You can attach those files to the page with the File Publisher object. The File Publisher object will be published all selected files together with the current page.
When the code you have inserted does not work then keep in mind that WYSIWYG Web Builder does not change the inserted code in any way! The HTML will be inserted and published "AS IS".
Common reasons for code not working are:
- did you remove the <!DOCTYPE>, <html>, <head> and <body> tags from the code?
- the code is invalid. For example: maybe you have accidentally missed copying a closing tag?
- the code depends on other scripts/files that you did not include (you can embed external files with the File Publisher object).
- the code conflicts with other code on the page (remove html, head and body tags, verify that there's only one jQuery library on the page).
- the code requires a different document type setting (in Page Properties)
- the code was inserted in the wrong place in the page.
- the code only works when it's published to a web server (like facebook scripts or ads).
- maybe you have enabled HTML/CSS/JavaScript formatting options (Tools->Options>HTML)? In that case, try resetting all options to default.
Trouble Shooting
Start of Page
The HTML will be inserted before all other code on the page.
Note that this section is mainly for adding server side code lie PHP. There should not be HTML or JavaScript code in this section!
The HTML will be inserted before all other code on the page.
Note that this section is mainly for adding server side code lie PHP. There should not be HTML or JavaScript code in this section!
Between <head></head> tags
The HTML will be inserted between the <head></head> tags.
The HTML will be inserted between the <head></head> tags.
<-- your html -->
<!DOCTYPE HTML PUBLIC "-//W3C//DTD HTML 4.01 Transitional//EN" "" target="_blank" class="weblink">http://www.w3.org/TR/html4/loose.dtd">
<html>
<head>
<!DOCTYPE HTML PUBLIC "-//W3C//DTD HTML 4.01 Transitional//EN" "" target="_blank" class="weblink">http://www.w3.org/TR/html4/loose.dtd">
<html>
<head>
Inside <body> tag
The HTML will be inserted inside the <body> tags. This section is for adding HTML attributes only, not for scripts!
The HTML will be inserted inside the <body> tags. This section is for adding HTML attributes only, not for scripts!
<head>
...
<-- your html -->
</head>
...
<-- your html -->
</head>
Before </body>
The HTML will be inserted right before the closing </body), at the end of the page.
The HTML will be inserted right before the closing </body), at the end of the page.
<body attribute=value>
After <body> tag
The HTML will be inserted after the <body> tags.
The HTML will be inserted after the <body> tags.
<body>
<-- your html -->
...
</body>
<-- your html -->
...
</body>
End of page
The HTML will be inserted at the end of the page, after the <body> tag.
The HTML will be inserted at the end of the page, after the <body> tag.
<body>
...
<-- your html -->
</body>
...
<-- your html -->
</body>
<html attribute=value>
<body>
...
</body>
<-- your html -->
...
</body>
<-- your html -->
Inside <html> tag
The HTML will be inserted inside the <html> tags. This section is for adding HTML attributes only, not for scripts!
The HTML will be inserted inside the <html> tags. This section is for adding HTML attributes only, not for scripts!
Do not use <div>
Select this option to insert the HTML code “AS IS”, without size and position information.
Select this option to insert the HTML code “AS IS”, without size and position information.
Use <div> to set position and size of the HTML
Select this option to insert the HTML code inside a DIV container with size and position information added by WYSIWYG Web Builder.
Select this option to insert the HTML code inside a DIV container with size and position information added by WYSIWYG Web Builder.
<div style:left:100px;top:100px;width:200px;height:200px;position:absolute">
<-- your html -->
</div>
<-- your html -->
</div>
Start of Page
The HTML will be inserted before all other code on the page.
Note that this section is mainly for adding server side code lie PHP. There should not be HTML or JavaScript code in this section!
The HTML will be inserted before all other code on the page.
Note that this section is mainly for adding server side code lie PHP. There should not be HTML or JavaScript code in this section!
<-- your html -->
<!DOCTYPE HTML PUBLIC "-//W3C//DTD HTML 4.01 Transitional//EN" "" target="_blank" class="weblink">http://www.w3.org/TR/html4/loose.dtd">
<html>
<head>
<!DOCTYPE HTML PUBLIC "-//W3C//DTD HTML 4.01 Transitional//EN" "" target="_blank" class="weblink">http://www.w3.org/TR/html4/loose.dtd">
<html>
<head>
Start of Page
The HTML will be inserted before all other code on the page.
The HTML will be inserted before all other code on the page.
<-- your html -->
<!DOCTYPE HTML PUBLIC "-//W3C//DTD HTML 4.01 Transitional//EN" "" target="_blank" class="weblink">http://www.w3.org/TR/html4/loose.dtd">
<html>
<head>
<!DOCTYPE HTML PUBLIC "-//W3C//DTD HTML 4.01 Transitional//EN" "" target="_blank" class="weblink">http://www.w3.org/TR/html4/loose.dtd">
<html>
<head>
Between <head></head> tags
The HTML will be inserted between the <head></head> tags.
The HTML will be inserted between the <head></head> tags.
<head>
...
<-- your html -->
</head>
...
<-- your html -->
</head>
Inside <body> tag
The HTML will be inserted inside the <body> tags. This section is for adding HTML attributes only, not for scripts!
The HTML will be inserted inside the <body> tags. This section is for adding HTML attributes only, not for scripts!
<body attribute=value>
After <body> tag
The HTML will be inserted after the <body> tags.
The HTML will be inserted after the <body> tags.
<body>
<-- your html -->
...
</body>
<-- your html -->
...
</body>
Before </body>
The HTML will be inserted right before the closing </body), at the end of the page.
The HTML will be inserted right before the closing </body), at the end of the page.
<body>
...
<-- your html -->
</body>
...
<-- your html -->
</body>
End of page
The HTML will be inserted at the end of the page, after the <body> tag.
The HTML will be inserted at the end of the page, after the <body> tag.
<body>
...
</body>
<-- your html -->
...
</body>
<-- your html -->
Inside <html> tag
The HTML will be inserted inside the <html> tags. This section is for adding HTML attributes only, not for scripts!
The HTML will be inserted inside the <html> tags. This section is for adding HTML attributes only, not for scripts!
<html attribute=value>
CSS in media query
This option makes it possible to add breakpoint specific CSS styles. This can be useful if you need different styles in breakpoints.
This option makes it possible to add breakpoint specific CSS styles. This can be useful if you need different styles in breakpoints.
